• Basic Knowledge of VersaWorks
    • What to Check First
    • Viewing the Information of the Connected Printer
    • Configuring Environment Settings
      • Setting the Language and the Unit
      • Setting the Quality of the Preview Image
      • Displaying the Queue Folder Name in the Layout Window
      • Setting the Number of Simultaneous RIP Processing Operations
      • Setting Warning Displays According to the Amount of Remaining Ink
      • Avoiding Memory Shortages in the Application
      • Setting the Measurement Instrument to Use
    • Setting and Performing Updates
      • Checking the Version Information
      • Viewing the Latest Information
      • Configuring Update Settings
      • Performing Updates
    • Initializing VersaWorks
    • Window Layout
      • 1. Menu Bar
      • 2. Setting Area
      • 3. Job Area
      • 4. Preview Area
      • 5. Layout Area
      • 6. Status Bar
  • Basic Operations
    • Test Printing
    • Basic Operations for Output
      • Step 1: Configure the Default Settings of Each Queue Folder
      • Step 2: Add Printing Data to the Job List
      • Step 3: Change the Print Settings of the Job
      • Step 4: Output the Job
      • Performing Only Processing by the RIP
    • Canceling Processing by the RIP and Printing
      • Canceling Processing by the RIP and Printing in Progress
      • Pausing Printing
      • Temporarily Disconnecting the Printer
    • Deleting Jobs and Intermediate Files
      • Deleting Jobs
      • Deleting the Intermediate Files of a Job
    • Outputting from Other Computers
      • Outputting from the Windows Client
      • Outputting from the Macintosh Client
    • Outputting from Applications
      • Windows 10, 8.1, 7
      • Mac OS 10.X
    • Viewing Job Log Information
      • Step 1: View the Job Log Information
      • Step 2: Save the Job Log Information
  • Output Settings
    • Setting the Layout
      • Setting the Media Size
      • Scaling Jobs for Printing
      • Adjusting the Printing Position
      • Setting the Number of Copies to Print
      • Setting the Spacing between Adjacent Images
      • Mirroring the Image
      • Rotating the Image
      • Adjusting the Printing Position in the Layout Area
    • Setting the Printing Quality
      • Setting the Halftone
      • Selecting the Interpolation Used for Scaling
      • Setting the Direction of the Print Head
      • Setting the Print Head Speed
      • Selecting the Color Setting
      • Customizing the Color Settings
      • Selecting the Printer Profiles
      • Characteristics of Each Matching Method
    • Adjusting the Output Colors
      • Adjusting the Color Saturation and Contrast of the Entire Image
      • Adjusting the Tone Curve
      • Applying the Tone Curve Adjustment to Other Jobs
    • Configuring the Printer Control Settings
      • Cut Sheet after Output
      • Setting the Space to the Next Printing Start Location
      • Performing Overprinting
      • Determining How to Alleviate Horizontal Bands
      • Using Media That Wrinkles Easily/Does Not Move Smoothly
      • Setting the Drying Time after Printing
      • Adjusting the Print Head Height to Match the Media Thickness
      • Setting the Heater/Dryer Temperature
      • Reducing the UV Lamp Illumination Intensity
      • Correcting the Dimensions in the Printing Results
    • Obtaining a Stable Output Color
      • Step 1: Saving the "Reference Printer Data"
      • Step 2: Saving the "Target Printer Data"
      • Step 3: Registering the "Reference Printer Data"
      • Step 4: Adjusting the Output Colors and Performing Printing
      • Exporting the Reference Printer Data
      • Checking the Detailed Settings of the Reference/Target Printer Data
  • Efficient Ways to Output Data
    • Optimizing Media Usage
      • Creating a Nested Job from the Selected Jobs
      • Creating a Nested Job Automatically
    • Automating Processing by the RIP and Printing
      • Processing a Job by the RIP or Printing a Job Automatically
      • Saving or Deleting a Job Automatically after Printing
    • Printing while Processing by the RIP
    • Saving the Printed Job for Later Use
      • Saving a VW Job File
      • Printing Using a VW Job File
      • Saving a VW Job + Source Data File
      • Printing Using a VW Job + Source Data File
      • Saving a PRT Native File
      • Printing Using a PRT Native File
    • Reusing Printing Settings Files
      • Loading Printing Settings Files
      • Overwriting Printing Settings Files
      • Saving Printing Settings Files with a New File Name
      • Deleting Printing Settings Files
  • Operating Special Printing Features
    • Adding Trim Marks or Margin Marks
    • Printing the Job Properties
    • Printing the Selected Area of the Image
      • Maintaining the Clipped Position
    • Printing the Tiled Image
    • Setting the Overlap Width
    • Performing Variable Printing
      • Step 1: Create a Template
      • Step 2: Create a Database
      • Step 3: Load the Files Required for Variable Printing
      • Step 4: Configure the Variable Printing Settings
      • Step 5: Start Printing
      • Editing Database Files
    • Printing a Single Image Side by Side
  • Using Spot Colors and Special Colors
    • Using Spot Colors
      • Printing with Spot Colors
      • Creating a Spot Color Library
      • Saving the Spot Color Library as a File
      • Deleting a Spot Color Library
      • Replicating and Editing the Spot Color Library
      • Fine-tuning the Output Color of a Spot Color
      • Assigning a Color from Another Spot Color Library to a Newly Created Spot Color
      • Assigning an Arbitrary Spot Color Name to Each White Ink/Metallic Silver Ink/Gloss Ink/Primer
      • Importing Spot Colors
      • Using a Color of Another Spot Color Library for the Output Color
    • Using the Roland Color System Library
      • Printing a Color Chart
      • Printing Colors from the Roland Color System Library
      • Registering a Roland Color System Library Color in the Application
    • Using Special Colors
      • Printing with Special Colors
      • Saving the Spot Color Library as a File
      • Replicating and Editing Special Colors
      • Deleting a Special Color Library
      • Registering a Color by Measuring with an Instrument
      • Fine-tuning the Output Color of a Special Color
    • Adjusting the Position and Size of Spot Color Plates
      • Correcting the Position of Special Color Plates
      • Correcting the Size of Special Color Plates
    • Generating Spot Color Plates
      • Step 1: Check Whether the Data Can Be Used to Generate Spot Color Plates
      • Step 2: Set the Spot Color Plate Generation Function
  • Performing Cutting
    • Creating Cutting Data
      • When Using Adobe Illustrator 10/CS/CS2/CS3
      • When Using CorelDRAW 11/12/X3/X4
    • Performing Cutting Only/Printing and Cutting Continuously
    • Print, Laminate, and Cut
      • Step 1: Print a Job with Crop Marks
      • Step 2: Cut the Processed Media
    • Configuring the Cutting Conditions
      • Step 1: Perform Test Cutting
      • Step 2: Configuring the Cutting Conditions
  • Managing Media Information
    • Registering New Media
      • Step 1: Create New Media
      • Step 2: Prepare to Create a Profile
      • Step 3: Create a Profile
      • Step 4: Register a Profile
      • Step 5: Configure the Default Printer Control Settings
      • Step 6: Finalize the Registration of the New Media
    • Saving the Media File
    • Loading Saved Media Files
    • Deleting the Media
  1. Home
  2. Basic Knowledge of VersaWorks
  3. Window Layout

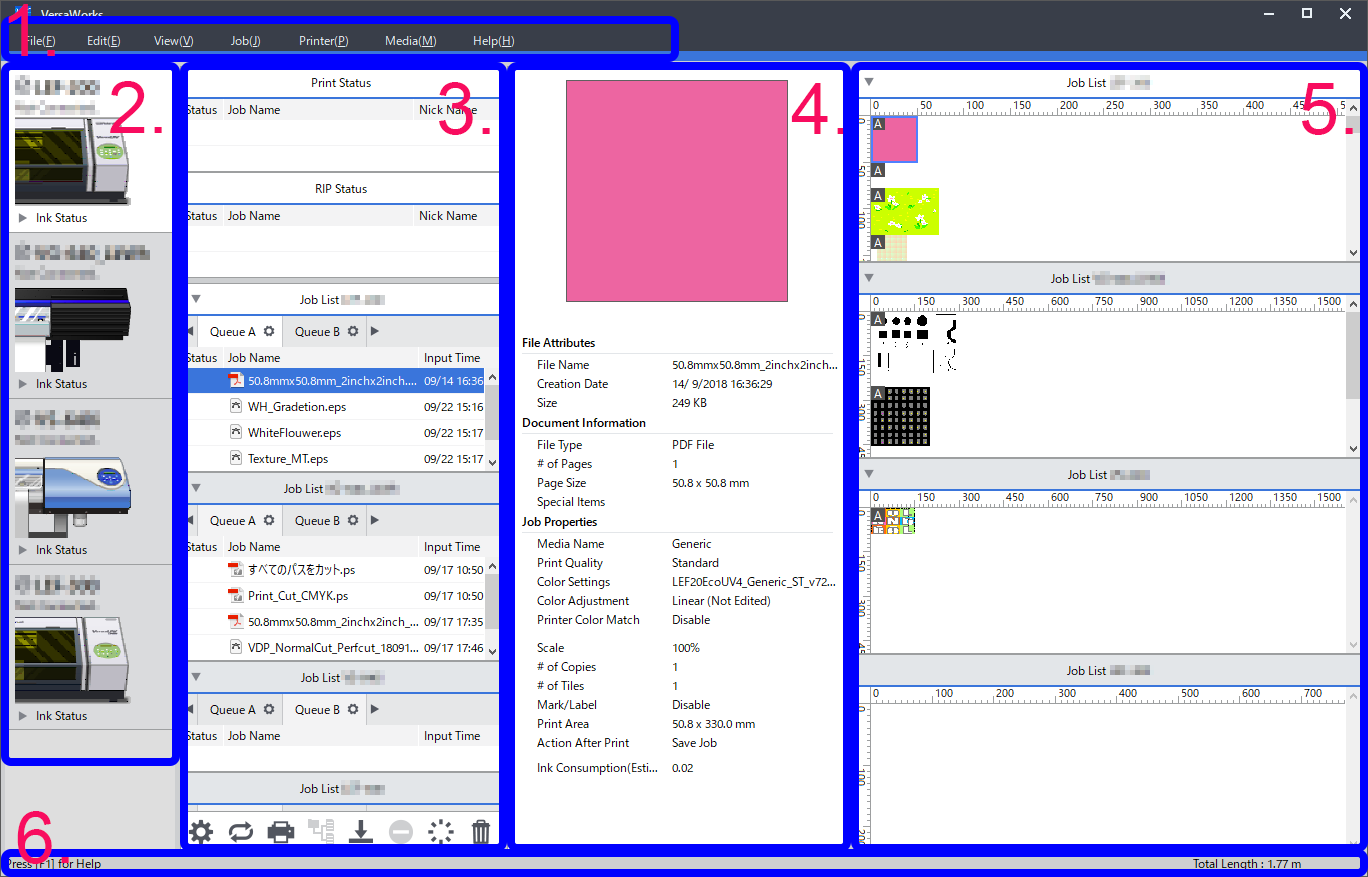
Window Layout

When you start VersaWorks, the top screen consisting of the following items is displayed:

  1. Menu bar
  2. Setting area
  3. Job area
  4. Preview area
  5. Layout area
  6. Status bar

  • Basic Knowledge of VersaWorks
    • What to Check First
    • Viewing the Information of the Connected Printer
    • Configuring Environment Settings
    • Setting and Performing Updates
    • Initializing VersaWorks
    • Window Layout
      • 1. Menu Bar
      • 2. Setting Area
      • 3. Job Area
      • 4. Preview Area
      • 5. Layout Area
      • 6. Status Bar
Copyright © Roland DG Corporation  http://www.rolanddg.com/