[Queue Properties] and [Job Settings] Windows
In the [Queue Properties] window and [Job Settings] window,
you can configure most of settings required to print jobs. Most of settings
are available on both windows while some settings are only available in
one of them.
This section explains the basics of [Queue Properties] and [Job
Settings] window and how to open each of them.
[Queue Properties]window
[Job Settings]window
[Queue Properties] window
You can configure the default print settings of each queue folder. These
settings are applied to all jobs that are added to each queue folder unless
they are changed in [Job Settings] window.
Clicking the buttons on the left side of the window, displays the associated
settings on the right side.
You can assign different settings for A or B Queue folder. For example,
you can assign different print quality settings to each folder, or use
one folder for printing from the RIP server and another one for printing
from clients.
Also, if you want to create an workflow for automatic processing of jobs,
you must complete the settings here.
 Automating
the RIP'ing and Printing Process
Automating
the RIP'ing and Printing Process
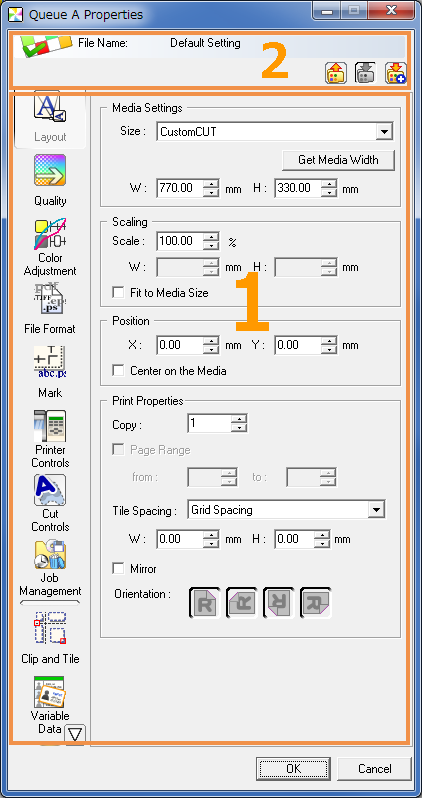 |
1 Printing settings area
2 Printing settings saving area
|
1. Printing settings area
You can change the printing settings for the selected job in the printing
settings area.
Description
of each button
2. Printing settings saving area
You can save the settings configured on the [Queue Properties]
window as a printing settings file. You can also load saved printing settings
files and apply them to jobs.
Printing Settings File Operations (Loading, Saving,
and Deleting)
|
Loads a printing settings file. All the
settings of the [Queue A (B) Properties] window will be
changed at the same time. |
|
Overwrites the selected printing settings file with the current
settings of the [Queue A (B) Properties] window. |
|
Saves the current settings of the [Queue A (B) Properties]
window to a printing settings file with a specified name. |
To display the [Queue Properties] window
Perform one of the following:
- Double-click the folder icon (A or B).
- Click [Edit] - [Queue A (B) Settings].

[Job Settings] window
Consists of the setting area, which is almost identical to [Queue Settings]
and the layout area, where you can drag the preview image to change the
layout.
 |
1 Settings area
2 Layout area |
1.Settings area
In the settings area, you can customize the print settings for the selected
job.
Clicking the buttons on the left side of the window displays the associated
settings on the right side.
These settings overrides the settings inherited from the [Queue Properties]
window.
Description
of each button
2.Layout area
In the layout area, you can adjust the position of jobs visually.
You can use the following tools (located at the top of the layout area)
to adjust the printing layout.
|
Cancels the most recent change and restores to the previous
state. |
|
Cancels the last  operation and restores the last change.
 |
|
Selects and moves the jobs to a new location by dragging. |
|
Moves the area previewed on the media by dragging. |
|
Enlarges or reduces the preview image centered on the clicked
position. Click and hold the downward arrow to switch between
zoom in and zoom out. |
|
Arranges the jobs to save media when there are multiple jobs. |
|
Arranges the jobs orderly to the upper left corner when there
are multiple jobs. |
|
Adjusts the width of the preview to fit the layout area. |
|
Adjusts the width and height of the preview to fit the layout
area. |
|
Zooms in the preview area with the upper left corner as the
origin. |
|
Zooms out the preview area with the upper left corner as the
origin. |
To display the [Job Settings] window
Perform one of the following:
- Double-click a job in the job list or layout window.
- In the job list, right-click a job, and then select [Settings].
- Select a job, and then click
 .
.
- Select a job, and then from the menu bar, click [Job] - [Settings].
- Double-click a preview image in the preview window.
Tip Description
of each button


 Layout
 Quality
 Color
adjustment
Color
adjustment File
format
File
format Mark
Mark Printer
control
Printer
control Cut
control
Cut
control Job
management
Job
management Clip
and Tile
Clip
and Tile Variable
print
Variable
print Special
color print
Special
color print