 or
or  .
.The [Queue A (B) Properties] window appears.
 .
.
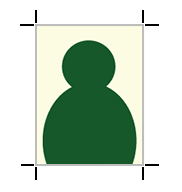
Trim Marks
Prints the trim marks at the four corners of the job as shown.

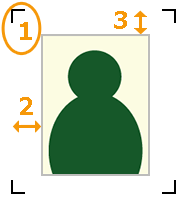
Margin Marks
Leaves margins around the job and prints the margin marks at the four corners as shown.
Specify the horizontal margin in [Horizontal] and the vertical
margin in [Vertical].
FOTOBA Cutline Marks
Adds the cut marks to be used with Fotoba International S.R.L.'s finishing cutters.
To print the lines in vertical direction, check the option [Print vertical lines].
Prints the trim marks at the four corners of the job as shown.

Margin Marks
Leaves margins around the job and prints the margin marks at the four corners as shown.
 |
1 Margin mark 2 Horizontal margin 3 Vertical margin |
FOTOBA Cutline Marks
Adds the cut marks to be used with Fotoba International S.R.L.'s finishing cutters.
To print the lines in vertical direction, check the option [Print vertical lines].
 Basic
Printing Operations
Basic
Printing OperationsThe selected marks are printed at the four corner of the image.


