Adjusting the Position and Size of Special
Color Plates
The special color plate correction function corrects for misalignment
in special color printing by expanding/reducing the special color printing
image and by fine-tuning the position of this image. You can easily check
the correction values by printing a test pattern.
| Position
correction |
|
 |
1
Media
2 Process color
3 Special color |
| Size correction |
|
 |
|
Depending on the printer, this function may not be
displayed.
Correcting the position
Correcting the size
Correcting the position
Adjust the printing position of the special color ink.
- Double-click
 or
or  .
.
The [Queue A (B) Properties] window appears.
- Click
 .
.
Under [Quality Settings], use [Mode]
to select the special color ink mode to use.
- Click
 .
.
- Use the [Special Color] list box under [Special Color
Plate Correction] to select the special color ink to correct.
- Click [Test Print].
The [Test Print] dialog box appears.
- Select [Pattern Settings].
Simple
Select this to make rough adjustments to position misalignments.
Detailed
Select this to make detailed adjustments to position misalignments.
- Click [OK].
A test pattern is printed.
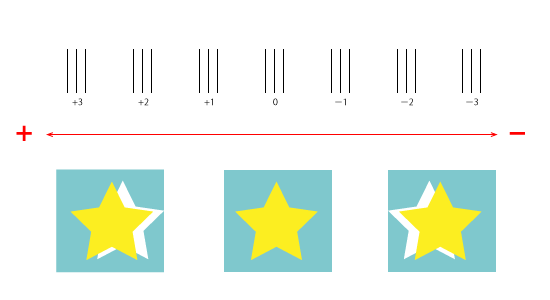
| Correction position
and printing position in the horizontal direction |
 |
| Correction
position and printing position in the vertical direction |

|
- Enter the [Horizontal] and [Vertical] correction
values.
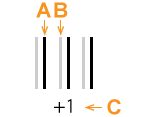
Select the values on the printed test pattern that make the misalignment
between A (the black line) and B
(the special color line) the smallest. Enter the C
values (which represent the [Horizontal] and [Vertical]
correction values) written on the test pattern.
 |
A
Black line (reference line)
B Special color line
C Correction value |
Note
The test pattern correction values differ for each piece of data.
Set the correction values for each piece of data.
- Click [OK].
If you have to adjust the size of the special color printing data,
proceed to Correcting the size.
Tip
• These settings can be customized per job using the [Job Settings]
window.

Correcting the size
Adjust the printing size of the special color ink.
Tip
If you will correct the size, we recommend that you first correct the
position.
- Double-click
 or
or  .
.
The [Queue A (B) Properties] window appears.
- Click
 .
.
- Use the [Special Color] list box under [Special
Color Plate Correction] to select the special color ink
to correct.
- Click [Test Print].
The [Test Print] dialog box appears.
- Select [Pattern Settings].
Simple
Select this to make rough corrections.
Detailed
Select this to make detailed corrections.
- Click [OK].
A test pattern is printed.
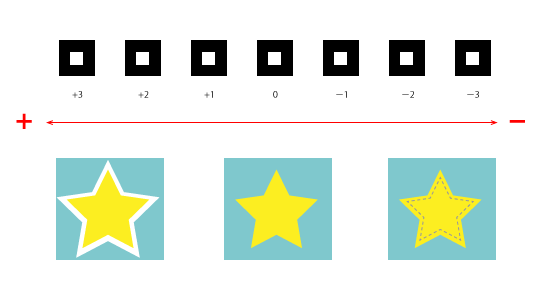
| Size
correction value and printing position |

|
- Enter the [Size] correction value.
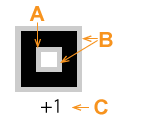
Select the value on the printed test pattern that makes the
misalignment between A (the black line) and
B (the special color line) the smallest.
Enter the [Size Correction] value written on the test
pattern.
 |
A
Black line (reference line)
B Special color line
C Correction value |
Note
The test pattern correction values differ for each piece of
data.
- Click [OK].
Tip
• These settings can be customized per job using the [Job
Settings] window.


 or
or  .
. .
. .
.


 or
or  .
. .
.


