Printing Variable Data

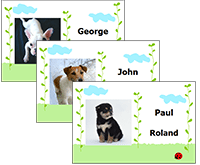
Variable data printing allows you to replace portions of the image to create outputs with unique text or images per copy. This function is useful when you want to print multiple copies of postcards or tickets changing the mailing address or ticket number per copy.


In order to perform variable data printing, you will need the following files:

This section illustrates the variable data printing method by using the production of a name tag as an example.

Step 1: Create a design template
Step 2: Create a database file
Step 3: Load the files required for variable data printing
Step 4: Configure the variable data printing settings
Step 5: Start printing


Step 1: Create a design template

Create the variable data template in your design application.
On the variable data template, you must create the fields (called "variable field") where the variable (texts or pictures) will be placed. You can create multiple variable fields (up to 20) in each variable data template.

  1. Start your application, create a new file and design your variable data template.
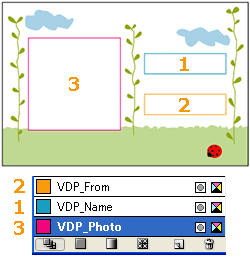
  2. Define the name of each variable field, and then create spot colors named as "VDP_(name of variable field)."
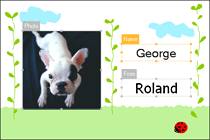
    In this example, we assume three spot colors named "VDP_Name," "VDP_From" and "VDP_Photo" were created for three variable fields ("Name," "From" and "Photo").
    For information on how to create the spot color, refer to the documentation of your application.
    Note
    • Enter "VDP" in all capital letters. Also, be sure to enter "_"(underscore). If the spot color names are not correctly set, VersaWorks Dual will not recognize the variable fields.
  3. Draw rectangular shapes (rectangle or square) using the spot colors created, at the locations you want to specify the variable fields.
    These shapes will be recognized as variable fields in VersaWorks Dual.
    Note
    • Non-rectangular shapes such as circles and trapezoid are not properly recognized as variable fields in VersaWorks Dual.

  4. Save the data.

Back to top

Step 2: Create a database file

Create a database defines the information to be printed in the variable fields.
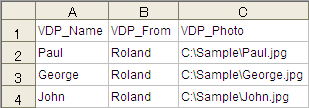
  1. Create a database using the application such as a spreadsheet software.
    For example, create the data as follows:

    • Enter the names of spot colors in the first row (NOT first column).
    • To print an image in the variable field, type the path of the image file.
      In this example, we assume the absolute path (e.g., C: \Sample\John.tif) of the image to be placed in the "VDP_Photo" variable field, created in Step 2 of "Step: 1: Create a design template," is typed in "VDP_Photo" column.
    • An image file should be in a file format (TIFF (LZW-compressed or uncompressed), EPS, JPEG, PDF or PostScript) that can be directly opened in VersaWorks Dual.
  2. Save the database file as a CSV (comma-delimited), text (tab-delimited or space-delimited) or XML file.

Tip

Back to top

Step 3: Load the files required for variable data printing

Add the design template file in the job list, and then load the database file.
  1. Add the design template file in the job list.
  2. Select and double-click the job from the job list.
    The [Job Settings] window appears.
  3. Click , and then select [Enable Variable Data Printing].
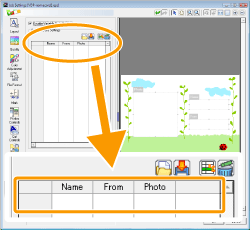
    A preview of the design template file is displayed in the layout area, and the [Attribute] window appears. Also, the names of the variable fields (spot color names with the prefix "VDP_" removed) created in step 2 of "Step 1: Create a design template," are displayed in the first row of the list in [Variable Data Settings].

  4. Click .
    The [Load from File] window appears.
  5. Select the database file created in "Step 2: Create a database file," and then click [Open].
    The content of the data appears in the list.
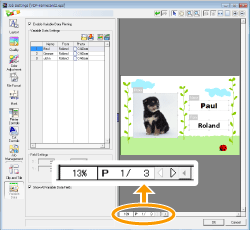
    Clicking the cursors at the bottom of the layout area displays the previews for each data set.

    There are two types of variable fields: [Image] and [Text]. The type of each variable field is displayed in the [Type] list in the [Attribute] window. When the database file is loaded, data that starts with strings that denote paths (such as "C:\") is recognized as [Image] data, otherwise it is automatically recognized as [Text] data.

Tip

Back to top

Step 4: Configure the variable data printing settings

Configure the following settings as necessary.
When the configuration is completed, click [OK] to close the [Job Settings] window.

Setting the attribute and size of a variable field

Follow the procedure below to configure the font size, font type or the layout of the image.
  1. Select the field to be configured.
    To apply the same setting to all data
    Click the first row (variable field name) in the list.
    The settings will be applied to all data.

    To apply the setting to the selected data
    Click each cell in the list.
    The settings will be applied to the selected data only.


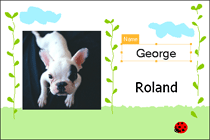
    The border line and the name of the selected field appear in the layout area.


  2. Set the data attributes in the [Attribute] window.
    When [Type] is [Image]
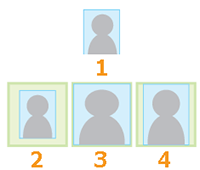
    Fit
    Select whether you want to fit the image in the variable field.

    1. Original image
    2. None
      Places the original image without resizing.
    3. Fit to Fields
      Changes the size of the image to fit in the variable field.
    4. Fit proportionally
      Changes the size of the image proportionally to fit either in height or width in the variable field
    Alignment
    Select the alignment of the image in the variable field.
    Rotate
    Rotate the image in the variable field in units of 90 degrees.
    Mirror

    Horizontally mirror the image in the variable field.

    Opacity
    Set the opacity of the image. Set 0% to make the image transparent.
    Draw on White Background
    Select this to print the background object on top when the background object and the variable field overlap.
    Color
    Set the background color inside of the variable field.
    If you click the square, the [Color Settings] window appears.
    In [ColorSpace], select RGB, CMYK or Transparent.
    When you select RGB or CMYK, use the slider bar or type the value to specify each color value.
    When [Type] is [Text]
    Font
    Select the font type.
    Font Size
    Select the font size.
    Tracking
    Adjust the spaces between two characters. Setting to 100 makes the spacing one-character wide.
    Auto Sizing
    Select this to automatically adjust the font size to fit the text in the variable field when the text is larger than the variable field.
    Alignment
    Select the alignment of the text in the variable field.
    Rotate
    Rotate the text in the variable field in units of 180 degrees.
    Mirror

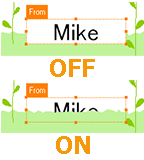
    Horizontally mirror the text in the variable field.


    Opacity
    Set the opacity of the entire variable field. Set 0% to make it transparent.
    Draw on White Background
    Select this to print the background object on top when the background object and the variable field overlap.
    Effect
    Click the following icons to set the text effect.
    Italic
    Bold
    Underline
    Shadow
    Outline
    Offset
    Set the offset widths of shadow characters in percent.
    Stroke
    Set the stroke widths of the outlined characters in points.
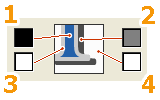
    Color
    Set the color of the text and the background color inside the variable field.
    1 Text color
    2 Shadow
    3 Outline
    4 Background
    If you click the square, the [Color Settings] window appears.
    In [ColorSpace], select RGB, CMYK or Transparent.
    When you select RGB or CMYK, use the slider bar or type the value to specify each color value.
    Tip
    • You can always change the variable field type by clicking the first row (variable field name) in the list in [Variable Data Settings] and selecting a different field from the [Type] list in the [Attribute] window .

  3. Configure the size and location of the variable field.
    Perform one of the following:
    Configuring in [Field Settings]
    X and Y set the distance from the top left corner of the job to the top left corner of the variable field.
    W and H set the width and height of the variable field.
    Dragging the mouse in the layout area
    Pointing to the selected field changes the pointer to a . Drag the field at this point to move it.
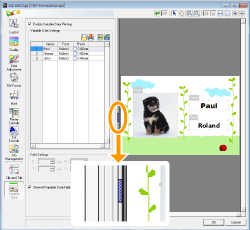
    Pointing to the squares on the border line of the selected field changes the pointer to a . Drag the square to adjust the size of the variable field.
    Tip
    • To undo or redo the operation, use or .
    • Clicking [Reset] with the variable data field selected will revert any changes made to the variable data field to its original settings.
    • Selecting [Show All Variable Data Fields] displays the border lines and field names of all variable fields in the layout area.


Editing the database

Follow the procedure below to edit the text in the database you loaded or to add a new data using the list in [Variable Data Settings].
To change texts or images
Double-clicking the cell which you want to change allows you to enter the text.
On fields with the [Image] attribute, you can right-click and select [Browse] to display the [Load from File] window and change the image file.
To add a data
Click to add a new row at the bottom of the list. Select each cell and enter the text or the location of the image.
To delete a data
Click the data number to be deleted, and then click .
To save the data list
Click .
In [File type], select CSV (comma-delimited), Text (tab-delimited or space-delimited) or XML, and then click [Save].
Tip

Back to top

Step 5: Start printing

Start printing.
  1. Select the job from the job list, and then click .
    Rip'ing and printing are performed.


Previous pageBack to topNext page