Printing the Selected Area of the Image

You can print the selected area of the image. This function is useful when you want to check the color tone or picture quality of a part of a large job.
Follow the procedure below to select the area of the job and print it.

  1. In the job list, double-click the job to be printed.
    The [Job Settings] window appears.
  2. Click .
    The [Clip and Tile] window appears.
  3. Select [Clip Image].
  4. Perform one of the following to specify the area (clip area).
    Entering the values numerically
    1. In [Size], enter the width and height of the clip area.
    2. In [Top Left Position], enter the location of the top left corner of the clip area with the origin at the top left corner of the image.
      Note
      • [Top Left Position] can only be set where the area set in [Size] does not go beyond the edges of the original image. Be sure to set [Size] before specifying [Top Left Position].

    Dragging the mouse over the layout area
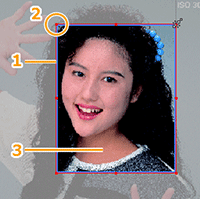
    1 Clip line
    2 Clip point
    3 Clip area
    1. In the layout area, click .
    2. Point to the clip point (small square) on the clip line (red line).
      The pointer becomes a .
    3. Drag the clip point to set the clip area.
    Tip
    • To fine tune the clip area, use or to enlarge the preview image, and then drag the clip point.
    You can combine both methods to fine tune the clip area.
    For example, use the mouse to set the clip area roughly, and then fine tune it by entering the values numerically. You can also maintain the clipped position.

    Maintain Clipped Position

  5. Click [OK].
  6. Click .
    Rip'ing and printing are performed.
    The selected area (clip area) is printed.

Maintain Clipped Position

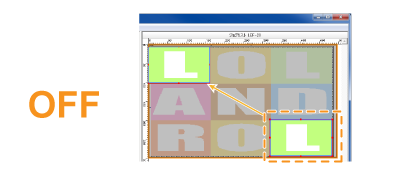
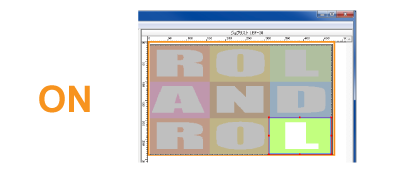
You can print a clipped image maintained at its original position. If you do not specify this setting, the clipped image will automatically be placed at the origin position.

Depending on the printer, this function may not be displayed.

A Source data

B Clipped position


Tip

If you have moved the data to a position other than the origin, that position will be used as the reference for clipping.

If you have rotated or mirrored the data, the rotation or mirroring will be taken into account when maintaining the position.


[Maintain Clipped Position] cannot be set in the following situations.

• When tiling has been set

• When there are multiple pages

• When the job is a nest job

• When multiple copies are being printed


Previous pageBack to topNext page