or
or  .
.The [Queue A (B) Properties] window appears.
 .
.
[Cut Sheet after Output]
Select this to cut the media after each job is printed.
Select this to cut the media after each job is printed.
[Use Custom Settings]
Check this option if you want to change the following items as.
Check this option if you want to change the following items as.
[Page Space]
Select this to specify the amount to feed the media after printing.
[Overprint]
Select this to perform overprinting.
Performing overprinting uses a large amount of ink, so smudging or uneven printing may occur. Perform test printing to check whether the desired printing results are obtained.
Select this to specify the amount to feed the media after printing.
[Overprint]
Select this to perform overprinting.
Performing overprinting uses a large amount of ink, so smudging or uneven printing may occur. Perform test printing to check whether the desired printing results are obtained.
In order to configure [Feed Calibration Controls], [Other
Controls] and [Heater Controls], select how you want
to control these options from one of the following:
The following options can be configured only when [Use Custom
Settings] is selected.
Use Default Media Settings
|
Uses the recommended settings for the media selected in [Media Name] in [Quality Settings]. |
|---|---|
Use Custom Settings
|
Uses the settings configured in this window. |
Use Printer Settings
|
Uses the settings configured on your printer. |
[Feed Calibration Controls]
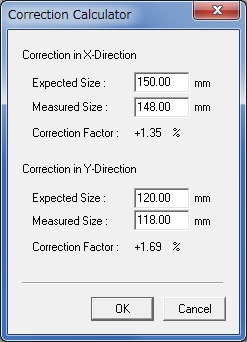
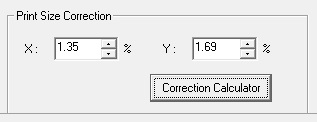
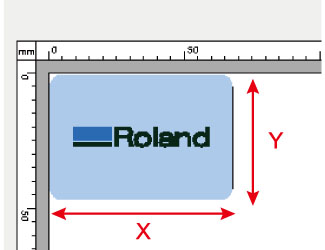
When using non-genuine media, you need to configure the feed calibration on your printer or VersaWorks Dual. When configuring in VersaWorks Dual, measure the feed calibration on your printer, and then enter the measured value in [Feed Calibration].
For information on how to measure a feed calibration, refer to the documentation of your printer.
[Other Controls]
[Vacuum Power]
Configure the intensity of the vacuum to hold the media flat on the platen.
Increase the power when the media often gets curled or buckled. When using soft media, decreasing the power may improve the media feeding.
[Dry Time]
Configure time (in minutes) to wait before printing the next page or perform cutting. For example, when you need the printed surface to be completely dry when performing printing and cutting, you can set the drying time.
[Head Height]
Configure the height of the print head for printing. In general, this setting should not be changed.
[Heater Controls]
[Pre Heater], [Print Heater], [Dryer]
Select each device to configure the temperature settings of the device.
Deselect to turn off the device when printing.
Select each device to configure the temperature settings of the device.
Deselect to turn off the device when printing.
[UV Lamp Adjustment]
Changing the illumination intensity can have an effect on printing quality (the ink may not cure, or banding and unevenness may occur). Use caution when changing this setting.
Turn this on when you want to change the UV lamp illumination intensity. If you change [Media Name], [Print Quality], [Resolution], or [Mode], you will have to set the illumination intensity again.
NoteChanging the illumination intensity can have an effect on printing quality (the ink may not cure, or banding and unevenness may occur). Use caution when changing this setting.
- Depending on the printer, some settings may not be available.
When using the printer that does not have the dryer temperature control feature, you can turn on/off the dryer by selecting/deselecting [Dryer].