Setting the Layout

This section explains the topics below on how to arrange the jobs on media.

Setting the media size
Scaling jobs for printing
Adjusting the printing position
Setting the number of copies
Setting the print spacing
Mirroring the image
Rotating the image
Adjusting the printing position in the layout area


Setting the media size

Follow the procedure below to set the size of the media used for printing.
Before setting, check if the printer is ready to print.
  1. Double-click or .
    The [Queue A (B) Properties] window appears.
  2. Click .
  3. Click [Get Media Width].
    VersaWorks Dual polls the printer and sets the width [W] of the printable area automatically.
    To specify length [H], select [CustomCUT] from [Size], and then enter a value.
  4. Click [OK].

Tip
Back to top

Scaling jobs for printing

Follow the procedure below to scale (enlarge or reduce) jobs for printing.
  1. Select and double-click the job from the job list.
    The [Job Settings] window appears.
  2. Click .
  3. In [Scaling], perform the desired operations from the options below. Either option will not allow to change the horizontal to vertical ratio.
    • Enter the scaling factor in [Scale].
      Enlarges or reduces the job for the scaling factor specified.
    • Enter the value in [W] (width) or [H] (height).
      Changes the job to the size specified. Specifying one dimension will automatically change the other.
    • Check the option [Fit to Media Size]
      The job is resized automatically to match the paper size set in [Media Settings].
      The scaling factor changes depending on the [Direction] setting in [Print Quality].
  4. Click [OK].

If you start printing, the job is printed with specified size.

Tip
Back to top

Adjusting the printing position

Follow the procedure below to adjust the position of jobs.
Before setting, check if the printer is ready to print.
  1. Double-click or .
    The [Queue A (B) Properties] window appears.
  2. Click .
  3. In [Position], perform one of the following operations.
    • Enter the values in [X] and [Y]
      The job is moved by specified offset in relation to the top left corner (origin). [X] sets the right distance and [Y] sets the downward distance.
    • Check the option [Center on the media]
      When using a roll media, the job is moved to the center of the media horizontally. When using a cut sheet or standard paper size, the job is moved to the center of the media vertically and horizontally.
  4. Click [OK].

Tip
Back to top

Setting the number of copies

Follow the procedure below to set the number of copies to print.
  1. Double-click or .
    The [Queue A (B) Properties] window appears.
  2. Click .
  3. Enter the number of copies in [Copy].
  4. Click [OK].

When you add a job to the job list, the specified number of copies are automatically laid out in the layout window. If you start printing, the jobs are printed as laid out on layout window.

Tip
Back to top

Setting the print spacing

Follow the procedure below to set the print spacing between jobs.
  1. Double-click or .
    The [Queue A (B) Properties] window appears.
  2. Click .
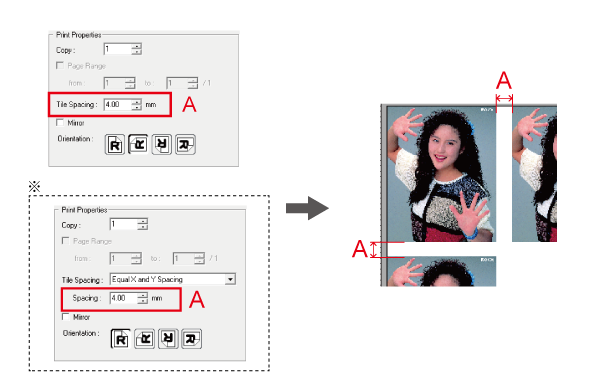
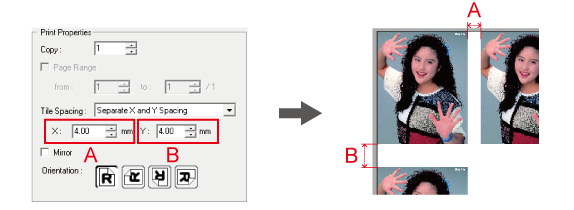
  3. In [Tile Spacing], enter the distance between the jobs.
    * Depending on the printer, the display may be different.
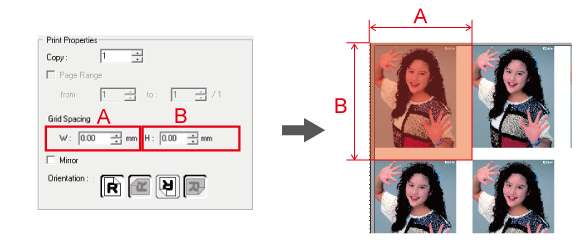
    Grid Spacing

    Equal X and Y Spacing

    Depending on the printer, the display of this function may be different or this function may not be displayed.

    Separate X and Y Spacing

    Depending on the printer, this function may not be displayed.

  4. Click [OK].

    When you add a job to the job list, the specified number of copies are automatically laid out in the layout window. When you start printing, the jobs are printed as laid out in the layout window.

Tip

Back to top

Mirroring the image

Follow the procedure below to mirror the image for printing.
  1. Double-click or .
    The [Queue A (B) Properties] window appears.
  2. Click .
  3. Select [Mirror].
  4. Click [OK].

If you add a job to the job list and print, a mirrored image is printed on the media.

Tip
Back to top

Rotating the image

Follow the procedure below to select the job from the job list and rotate the image for printing.
  1. Select and double-click the job from the job list.
    The [Job Settings] window appears.
  2. Click .
  3. In [Direction], click one of the following icons:
    Upward
    Left
    Downward
    Right
  4. Click [OK].

Back to top

Adjusting the printing position in the layout area

You can visually adjust the position of jobs in the layout area of [Job Settings] window.
  1. Select and double-click the job from the job list.
    The [Job Settings] window appears.
  2. Click .
  3. Click .
  4. Click the preview image in the layout area.
    The selected preview image is highlighted with a light blue border.

    Tip
    • Select multiple jobs by clicking the preview images while holding down the Shift key or dragging over the preview images.
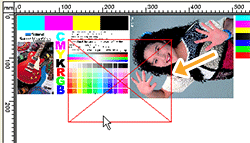
  5. Drag the selected preview image to a new location. Jobs cannot overlap each other. If you drag a preview image on top of another image, a red box appears as shown below.

    In the layout area, you can use the layout editing tools to adjust the layout.
    Layout area
  6. Click [OK].

You can check the print preview in the layout window of the top screen.


Previous pageBack to topNext page