|
The machine doesn't
run
| • Is the cable connected? |
|
Check that the power
cord and the I/O cable to the
computer
are connected correctly. |
• Is the power switched on? |
|
If not, turn on the
machine power. |
• Is the machine ready to receive cutting data? |
|
If the display shows the following,
cutting is not performed even when data is sent. Select the loaded
material, press the ENTER key, and set the machine ready to receive
cutting data.
 |
• In the case of serial connection, are the communication
parameters on the machine matched with the computer? |
|
On the I/O menu, select
AUTO or SERIAL, and match the communication parameters
on the computer and machine.

Reference:Setting
the Communication Type for Connecting to the Computer |
• Are the computer settings correct? |
|
Set the communication
settings, memory switch, interface cards, and other parameters correctly
by referring to the manual for your computer. |
• Are the software application settings correct? |
|
Select the appropriate driver for
the machine. For the selection procedure, refer to the manual for
the software application. |
• Are the driver software settings correct? |
|
Set the output port
and communication parameters correctly. For the setup procedure,
refer to the manual for the your driver. |
 |
|
If the machine still does not run even after checking the above items,
perform a self test.

If the self test cannot be executed, the machine may have malfunctioned.

Contact your authorized Roland DG Corp. dealer or service center.
The material slips away from the pinch rollers while cutting
| • Is the loading lever lowered? |
|
If it is, the material
is not secured in place.

Check that the pinch rollers are within the edges of the material,
and raise the loading lever. |
• Is the material loaded in parallel with the grit rollers? |
|
If the front edge of the material
is cut at an angle, trim off an excess portion so that the front
edge is parallel with the grit rollers, and then load the material. |
• Is the material making contact somewhere while cutting? |
|
Make sure that the
left and right edges of the material do not make contact with the
inner surfaces of the machine while cutting.

Such contact not only damages the material, but also hinder normal
material feed and cause the material to slip out of position. |
• Was the material feed checked before cutting (for roll
material)? |
|
Use the AREA display menu
to feed out the amount of material to be used (plus a margin of
about 0.2 m), and make sure the material does not come loose from
the pinch rollers. |
• Are the pinch rollers damaged or deformed? |
|
If the material comes
loose even when it is loaded correctly, the pinch rollers may have
reached the end of their service life.

Contact your authorized Roland DG Corp. dealer or service center. |
• Is there a fluorescent lamp near the machine? |
|
If the light from a
fluorescent lamp hits the machine, the sensor that detects the length
of the material (material feed direction) may not work properly,
and the material may come loose.

If the material comes loose even when it is loaded correctly, move
the machine to a location where the light from the fluorescent lamp
does not hit the machine. |
 |
|
Uncut areas remain or cut edges are not clean
| • Are the blade and blade holder
securely mounted? |
|
Make sure the screws
are tightened securely so that they do not come loose while cutting. |
• Is the tip of the blade broken? |
|
If it is, then replace the blade
with a new one. |
• Is there any buildup of dust or material adhesive on
the tip of the blade? |
|
If dirty, remove and
clean the blade. |
• Is there any buildup of pieces of material or dust inside
the blade holder? |
|
Take off the tip of the blade holder
and remove any pieces of material or dust inside. |
• Is the amount of blade extension correct? |
|
If the setting for the amount of
blade compensation is not correct for the blade, corners may be
rounded or have horns.
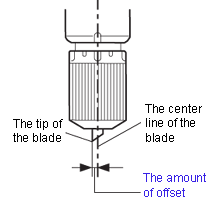 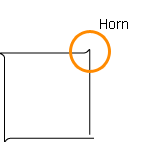

Reference:OFFSET |
• Are the blade force and cutting speed appropriate for
the material being cut? |
|
Carry out a cutting
test and adjust the settings until cutting can be performed adequately.

Reference:Setting
the Cutting Conditions |
• Is the blade protector damaged or deformed? |
|
If the blade protector
is damaged, the material may not be cut correctly even if the machine's
settings and the installation of the blade and blade holder are
all correct.

If this happens, contact your authorized Roland DG Corp. dealer or service center. |
 |
|
The results of cutting are displaced or uncut portions remain
| • Is a thick material being
used? |
|
When using thick material,
decrease the UPSPEED
value in the display menu. |
• When using roll material, was the amount of material
to be cut pulled out before performing cutting? |
|
If cutting is performed without
pulling out the material, the material may slip or operation may
stop due to a motor error.

Reference:Loading
the Material |
 |
|
Crop marks cannot be read

When the machine cannot read crop marks, it displays
an error message and pauses operation.

If this happens, press any key on the operation panel.

This moves the cutting carriage to the right side of the machine making
the following tasks easier.

Remove the material, check the following items, and then reload the
material.
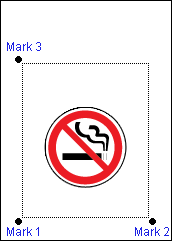
| • Is the material loaded correctly? |
|
Refer to Cutting
by Automatically Aligning the Position and load the material
in the correct position. |
• Is the material curled upward? |
|
Straighten out the
material. Then, refer to Cutting
by Automatically Aligning the Position and load the material
in the correct position. |
• Does the material have creases or wrinkles? |
|
Crop marks may not
be read if the material has creases or wrinkles.

Stretch the creases or wrinkles out and load the material again.

If the crop marks still fail to be read, prepare a new material
without creases or wrinkles and repeat the operation from printing
the data. |
• Are you using a material that is not white? |
|
Crop marks cannot be detected if
decorations or colors are on the material.

Crop marks also cannot be detected on glossy material even if it
is white. |
• Are the crop marks blurred or are they in a color other
than black? |
|
Set the color of crop marks to
black, specify 100% density, and print the data again.

Reference:Using Crop
Marks |
• Are the size and shape of crop marks correct? |
|
Make the crop marks
perfect circles with 10-mm diameter.

The machine can only detect crop marks in the prescribed shape.

Reference:Using Crop
Marks |
• Are the crop marks at the correct positions? |
|
Refer to Using
Crop Marks and place the crop marks at the correct positions. |
• Is the [ROTATE] menu set to [90deg]? |
|
 Set
the [ROTATE] menu to [0deg] when using crop marks. Set
the [ROTATE] menu to [0deg] when using crop marks.

Crop marks cannot be read if set to [90deg].

Reference:ROTATE |
• Is direct sunlight or high intensity indoor light hitting
the machine? |
|
If direct sunlight or indoor light
hits the cutting carriage sensor, crop marks may not be detected.

Move the machine to a location where direct sunlight or indoor light
does not hit the machine. |
 |
|
|
MARK2
NOT FOUND
|
| WIDTH NG |
| ANGLE TOO BIG |
| • Is the material loaded at
an angle? Are the printing results crooked? |
|
Crop marks cannot
be detected in the following cases.

• The left and right crop marks are slanted by 5 degrees or
more with respect to the moving direction of the carriage.

• The crop marks are offset by 15 mm in the material-feed direction.
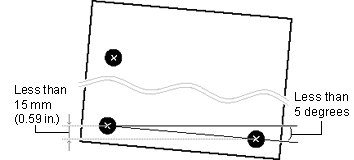
Check the printing results and load the material correctly by referring
to Cutting by Automatically Aligning
the Position. |
• Do the distances between crop marks specified by the
program match those specified on the machine? |
|
Set the distance specified by the
program correctly in the machine. |
 |
|
|
MARK3
NOT FOUND
|
| LENGTH NG |
| ANGLE TOO BIG |
| • Are the crop marks at the
correct positions? |
|
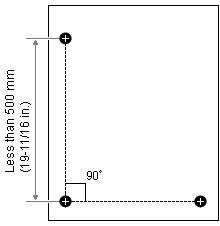
If the angle formed
by the two lines connecting the center of the three crop marks is
not 90 degrees, the crop marks cannot be read.

Crop marks cannot be read if the distance between crop marks in
the material-feed direction is 500 mm or more.
Refer to Using Crop Marks and
place the crop marks at the correct positions.
 |
 |
|
• Is the printing expand or reduced? |
|
If the
size is expanded or reduced when printing, the crop marks cannot
be read when cutting.

Print the data by specifying 100% for the magnification. |
 |
|
[ Back/ Next]
|