Window Layout
When starting VersaWorks Dual, the top screen consisting of the following
areas is displayed.
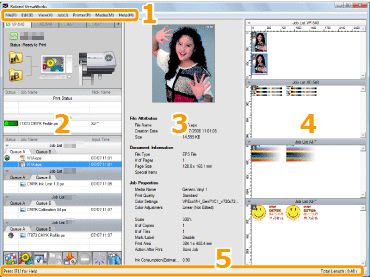
1 Menu bar 2 Main window 3 Preview window
4 Layout window 5 Status bar
You can display or hide the preview window, layout window and status
bar by selecting or deselecting items in [View] on the menu bar.
1. Menu bar
2. Main window
3. Preview window
4. Layout window
5. Status bar
1. Menu bar
The menu bar consists of various menus used to configure the VersaWorks
Dual settings or operate functions.

2. Main window
The main window consists of the setting area and job area.
Setting area
Job area
Setting area
In the setting area, you can check the VersaWorks Dual settings and printer
status.
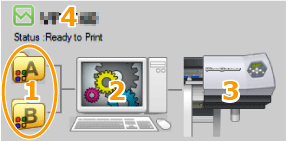
1 Folder icons 2 Computer icon
3 Printer icon 4 Status display area
1. Folder icons
Double-clicking the icon displays the
[Queue A (B) Properties]
window. In this window, you can configure default settings of each
queue folder.
2. Computer icon
Double-clicking the icon displays the
[Preferences] window.
In this window, you can configure VersaWorks Dual environment settings
such as the display language and display unit.
3. Printer icon
The shape of the printer icon shows the model of the printer connected
to the computer. Double-clicking the icon displays the
[Printer
Status] window. In this window, you can check the printer information
such as the port number and remaining amount of ink.
4. Status display area
Displays the model name of the printer and the current printer status.
Below is an explanation of what it means when each indicator lights.
|
The printer is properly connected to the computer. |
|
The amount of remaining ink is low. |
Job area
In the job area, you can perform operations on jobs such as RIP and printing.
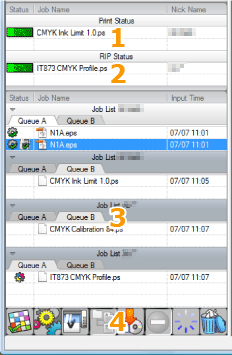
1 Print queue 2 RIP queue
3 Job list 4 Job tool bar
1. Print queue
Displays jobs (original file names) waiting to be printed or being
printed. The
[Status] field shows the progress information
during printing.
2. RIP queue
Displays jobs (original file names) waiting to be RIP'ed or being RIP'ed.
The
[Status] field shows the progress information during RIP'ing.
3. Job list
Displays jobs (original file names) registered in the queue. To select
a job to be RIP'ed or printed, click the desired job. To display a
shortcut menu with a list of operations (the same functions as the
job tool bar), right-click the desired job.
Clicking the
[Queue A (B)] tab switches the display between
the job lists of Queue A and Queue B.
The
[Status] field shows the job status using the following
icons :
|
The job is being RIP'ed. |
|
The job has been RIP'ed. |
|
The job has been RIP'ed (including cut data). |
|
The job is being printed. |
|
The job has been printed. |
|
The RIP or printing has been canceled for the job. |
|
The preview for the job is being generated. |
|
The job has been saved. |
|
The file format is not supported by VersaWorks Dual. |
|
The job is waiting for the automatic nesting process. |
|
An error occurred and the RIP or printing cannot be performed. |
In case  is displayed,
press
is displayed,
press  in the job tool
bar to delete the intermediate files and enable the RIP or printing.
in the job tool
bar to delete the intermediate files and enable the RIP or printing.
The [Event] field shows the type of the original file using
icons (such as  to
indicate nested jobs).
to
indicate nested jobs).
4. Job tool bar
Click the button to perform the corresponding operation for the job
selected from the job list.
|
Displays the [Job Settings] window to configure
the settings of the selected job such as the layout and quality. |
|
RIPs the selected job. |
|
Prints the selected job. |
|
Groups the selected jobs to form a single nested job. |
|
Saves the printing settings and RIP'ed data of the selected
job to a file. |
|
Cancels the RIP or printing in progress. |
|
Deletes the intermediate files for the selected job. |
|
Deletes the selected job from the job list. |
Tip
- These operations are also available using the shortcut menu
displayed by right-clicking the [job] list.
3. Preview window
The preview window displays the preview image, file attributes, document
information and properties of the job selected in the job list.
1 Job preview 2 File attributes
3 Document information 4 Job properties
1. Job preview
Double-clicking the preview image displays the [Job
Settings] window.
In case you select a job that consists of multiple jobs and/or multiple
pages, the cursor buttons appear under the preview image.
- Click the cursor buttons on the left to display the preview and
information of the previous/next job.
- Click the cursor buttons on the right to display the preview and
information of the previous/next page.
2. File information
The file name, date and time of creation, and size are displayed.
3. Document information
The file type, number of pages, page size, and special items are displayed.
The special items have the following meaning:
|
The file contains cutting data. |
|
Variable data printing is performed. |
|
White ink is used. |
|
Gloss ink is used. |
|
Metallic ink is used. |
|
Primer is used. |
4. Job properties
The media name, the print quality, the printer color settings, the color
adjustment settings, the scale, the number of copies, the number of tiles,
the mark or label, the print area, the action performed after printing,
and the amount of ink consumed are displayed.
If RIP processed, the word "Estimation" next to ink consumption
desappears and an approximate ink consumption will be displayed.
4. Layout window
In the layout window, you can preview the layout on the media.
Double-clicking the preview image displays the [Job
Settings] window.
There are rulers on the top and left sides of the layout window. You can
confirm the sizes of the media and the job. The unit used in these rulers
is determined by the [Unit] setting in the [Preferences]
window.
If you check the [Show Queue A,B Identifier in Layout Window] check
box in the [Preferences] window, the jobs displayed in the layout
window will display the queue they belong to.
 Configure
the preferences
Configure
the preferences
5. Status bar
In the status bar, you can check the current status of VersaWorks Dual
(description of the selected feature, available space on the current drive
and total print length).
Also, when the VersaWorks Dual automatic update
feature is enabled,  will
be displayed.
will
be displayed.


