Using Roland Color System Library

Roland Color System Library is Roland's original spot color library. Roland Color System Library consists of more than 1000 spot colors. A special feature of this library is that you can easily create a color chart with your printer.
In contrast to commercially available color charts, this color chart represents the actual colors that "your printer" and "your media" can reproduce (slight color differences is possible to occur depending on the conditions of the printer and media). By selecting colors from this color chart and creating illustrations with these colors, you can accurately reproduce the desired colors.

This section explains about printing the Roland Color System Library color chart and using colors from the library.

Printing a color chart
Printing colors from Roland Color System Library
Registering a Roland Color System Library's color into the application

Printing a color chart

Follow the procedure below to print a color chart of Roland Color System Library.
  1. Load the media to which the color chart will be printed, and then prepare the printer for printing.
  2. Double-click .
    The [Queue A Properties] window appears.
  3. Click , configure the settings in [Quality Settings] and [Color Management], and then close the [Queue Properties] window.
    Note
    • When printing a color chart, the [Quality] settings from the [Queue Properties] window are always applied. Since you cannot change the quality settings for the job using the [Job Settings] window after it has been added, be sure to configure the settings in the [Queue Properties] window before performing the following operations.
  4. Click [Media], and then select the color chart that you want to print.
    This message appears: The following job will be printed. Do you want to continue? Check that the media in the printer is large enough for the displayed page size.
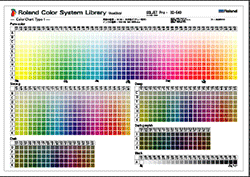
    Color Chart Type-1
    The colors in the library are categorized by saturation and arranged to vary in hue in the horizontal direction and in brightness in vertical direction. To print this color chart in its original size, you need A1-size or larger media.

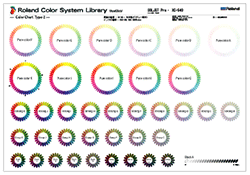
    Color Chart Type-2
    The colors in the library are categorized by color tone and a color wheel is printed for each tone. (Black colors are arranged linearly by brightness.) To print this color chart in its original size, you need A1-size or larger media.

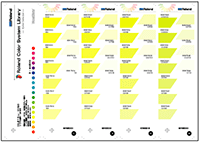
    Color Selector
    Prints the ink combination chart. The chart shows the ink combination used for printing each spot color. Although each page is printed in A4 size, you can cut the pieces along the trimming marks and bind them in numeric order (outline numbers) to create a color sample book that can be used to compare the colors.

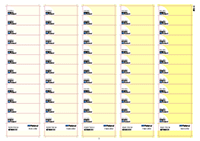
    Color Chips
    Prints 12 color chips per color for 5 colors in A4 size. The colors are categorized by color tone. Clicking [Color Chips] and selecting the tone name will print the color chips for the selected color tone.

    Tip
    • [Color Chips] are printed with trimming marks to be trimmed and used individually. If you print the color chips on adhesive back media using the printer with the cutting feature, you can create color chip stickers by setting [Operation Mode] in [Cutting Options] to [Print & Cut].
      Performing Cutting Only/Printing and Cutting Continuously
  5. Click [OK].
    The selected color chart is added to the job list.
  6. Select and double-click the color chart that was added in the job list.
    The [Job Settings] window appears.
  7. Click , and then configure the [Media Settings].
  8. Click [OK].
  9. Click .
    Rip'ing and printing the selected color chart are performed.

The following information is printed on each color chart.
Printer name, serial number, media type, ink type, print quality, resolution, mode settings, halftone settings, interpolation settings,printing direction, processing date and time, ID (identifier number).

See Also
Setting the Layout
Configuring the Print Quality
Configuring the Color Settings
Using Spot Colors


Back to top

Printing colors from Roland Color System Library

You can use the spot colors in the Roland Color System Library for printing in the same way as using other spot colors. See the link below for more information.
Printing with spot colors

Back to top

Registering a Roland Color System Library's color into the application

You can load Roland Color System Library's colors into the color palette of your application. This is very useful, as this allows you to quickly select the spot colors from the color palette.
VersaWorks comes with palette data for some applications. You can register this palette data in your application. Currently, swatch libraries for Adobe Illustrator 10, CS, CS2, and CS3, and for CorelDRAW 11, 12, and X3 are available.
Swatch Library files are stored in the RIP Server (the computer with VersaWorks installed). These files should be copied to computers with Adobe Illustrator or CorelDRAW installed. The procedures are the same for both Windows and Macintosh clients.

When using Adobe Illustrator 10, CS, CS2, or CS3

  1. Open the folder [C:\Program Files\Roland VersaWorks\Swatch\Illustrator] in the RIP server (computer with VersaWorks installed).
  2. Copy the file [Roland Color System Library.ai] to [Swatch] (or [Swatch Library]) folder under the Adobe Illustrator installation folder.
    If the target computer is different from the RIP Server, use the network or other external storage device (USB drive or floppy disk).
  3. Launch Illustrator on the target computer.
  4. In Adobe Illustrator, click the menu item [Window] - [Swatch Library] - [Roland Color System Library].

When using CorelDRAW 11, 12, or X3

  1. Open the folder [C:\Program Files\Roland VersaWorks\Swatch\CorelDRAW] in the RIP server (computer with VersaWorks installed).
  2. Copy the [userinks.cpl] file.
    If the target computer is different from the RIP Server, use a network or an external storage media (such as a USB drive or floppy disk) to copy the file.
  3. Launch CorelDRAW on the target computer.
  4. In the CorelDRAW menu, click [Tools] - [Palette Editor].
    The Palette Editor dialog box appears.
  5. Click the [Add Color] icon.
    The [Select Color] dialog box appears.
  6. Select the [Palettes] tab.
  7. Select [Custom Spot Colors] from the [Palette] drop down list.
  8. Click the icon (File Open) next to the drop down list.
  9. Select the file [userinks.cpl] copied in step 2 and click [Open].
  10. Select the colors from the list that you want to add to [Custom Spot Colors] and click the [Add to Palette] button.
  11. Click [Close] to close the [Select Color] dialog box.
  12. Click [OK] to close the [Palette Editor] dialog box.
  13. Delete the [userinks.cpl] file you copied in step 2.
  14. Relaunch CorelDraw.


See Also
Printing from Other Computers


Previous pageBack to topNext page