|
In hyperVIEW®, the part-specific toolpaths from hyperDENT are converted into a postprocessor cycle in the machine-specific NC file.
Load this NC file onto your machine and start the editing process.
You can also simulate the toolpaths in hyperVIEW (optional).
The hyperVIEW program starts automatically once the calculation has finished. The data is loaded automatically.
You can manually start hyperVIEW by selecting the [Extras] > [hyperVIEW] menu item or the [Part] > [Show toolpaths] option in the context menu.
For a detailed description of hyperVIEW, select the hyperVIEW Help menu item (F1) (see: hyperVIEW, important operations, postprocessor cycle).
The key steps are detailed in the following section.
Postprocessor cycle, creating an NC file
|
The display window for the “NC jobs” tab shows the details and possible selections for the postprocessor cycle.
|
|
1) Select the “NC jobs” tab. The toolpaths and fixtures are set correctly by default in the “NC jobs” tab.
|

|
2) Select the machine.
|

|
3) Write NC file: Click the [Write NC files] icon at the top of the toolbar. This will open the tool window.
|
|
4) Check the tool entries in the window.
|
|
5) Start creation: Click OK.
The NC file is stored in the file directory according to the preselected path.
|
|
6) Load file into the machining device.
|
|
|
Simulation
|
The simulation is used to display the toolpaths with the tool, blank, fixture, and machine model.
The simulation is run using the toolpaths that have been calculated in hyperDENT.
|
|
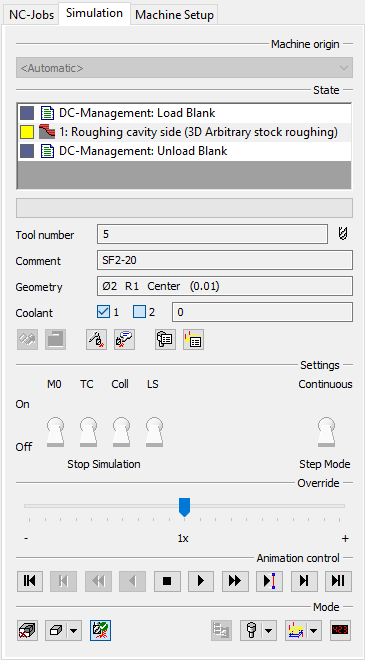
The display window for the [Simulation] tab shows the setting options for the simulation.
Stop Simulation
|
|
|
|
On/Off
|
Simulation stops when condition is met.
|
|
M0
|
Programmed stop
|
|
TC
|
Stop upon tool change
|
|
Coll
|
Stop upon collision; test must be activated must be activated
|
|
LS
|
Stop when limit switch is reached; machine simulation required
|
Continuous
|
|
Slow simulation; speed can be influenced via slider
|
Step Mode
|
|
Fast simulation; speed can be influenced via slider
|
Material removal
|

|
On/Off
|
|

|
Show material removal
|
|

|
Show tool
|
|

|
Show toolpaths
|
|
|
1) Hide the fixture on the [NC jobs] tab: Click the lamp icon in front of the [Fixture] field.
|
|
2) Select the [Simulation] tab.
|
 
|
3) Start simulation: Click the icon in the recorder bar.
> = Step by step
>> = Continuous
|
|
4) Set the process speed using the slider.
|
| 

