| Printing and Cutting (When Using Adobe Illustrator) |
Step 1: Create
the data
-
Start Illustrator and open a new document.
Set the art board.
-
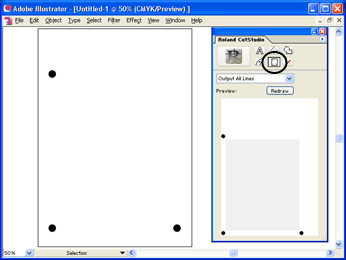
From the Window menu, click CutStudio Plug-in.
The Roland CutStudio palette opens.
-
Click
 on the Roland CutStudio palette.
Crop marks are inserted in the art board.
-
Click
 ,
and then click Crop-mark Locations.
,
and then click Crop-mark Locations.
The Crop-mark Locations dialog box opens.
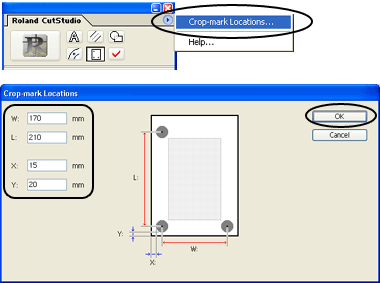
Set the crop mark positions according to the art board size, and then click OK.
When cutting with the GX-24, enter the following values.
Size Crop mark positionsA4 portrait X: 15 mm, Y: 20 mm
L: 170 mm, W: 210 mmA4 landscape X: 30 mm, Y: 20 mm
L: 240 mm, W: 120 mmA3 portrait X: 30 mm, Y: 20 mm
L: 240 mm, W: 330 mmA3 landscape X: 15 mm, Y: 20 mm
L: 380 mm, W: 205 mmB4 portrait X: 15 mm, Y: 20 mm
L: 215 mm, W: 275 mmB4 landscape X: 15 mm, Y: 20 mm
L: 325 mm, W: 170 mm
* If you are using a material of size larger than A4 that is not listed above, set the values by referring to the figure below.
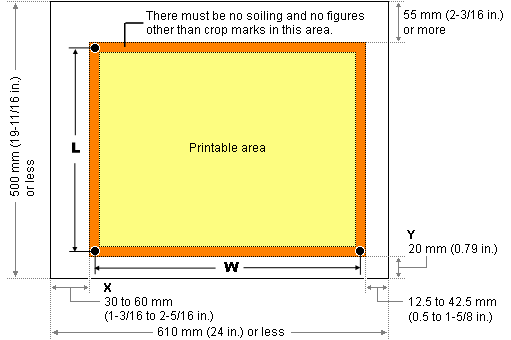
Hint:It is recommended that the Y value be set to 20 mm. It eliminates the hassle in loading the material.
Reference: Load the printed material
-
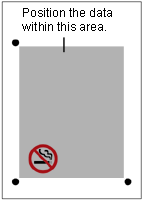
Position the data in the area within the crop marks.
-
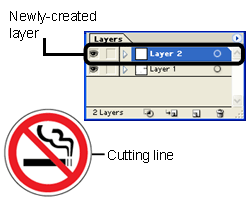
Draw the cutting lines.
* Create a new layer for the cutting lines and draw the cutting lines there.
-
Save the data.