Configuring the Cutting Conditions
On printers with cutting capabilities, cutting conditions can be set from VersaWorks. Follow the procedure below to configure the cutting conditions.
Step 1: Perform a cutting test
Step 2: Setting the cutting conditions
Step 1: Performing a cutting test
Follow the procedure below to perform a cutting test to check the cutting result.
- Click [Printer] - [Test Cut].
This message appears: The following cutting will be performed. Do you want to continue? A test cut will be performed under the displayed conditions. Check the page size and media type.
- Click [OK].
The job for a cutting test is automatically added to the job list (queue A folder), and then the following shape is automatically cut. Once the cutting test has been done, the job is automatically deleted from the job list.
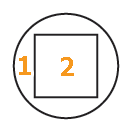
- Check for the distortion in the shape.
If the shape is distorted, reduce [Speed] (cutting speed).
- Peel off the circle 1. Make sure that only the circle 1 is separated.
If the square also peels off, increase [Pressure] (blade force).
If some uncut areas remain, reduce [Speed].
- Peel off the square 2.
Make sure that there are faint traces of the blade on the backing paper.
If the blade trace is indistinct, increase [Pressure].
If the blade trace is too deep or the backing paper is also cut, reduce [Pressure].

Step 2: Setting the cutting conditions
Follow the procedure below to configure the cutting conditions based on the type of the media or the result of a cutting test.


 or
or  .
. .
.