| What to Do If |
The printing and cutting
positions are offset.
If the printing and cutting positions are offset, this may be because the printing positions of the crop marks are offset.
If this is the case, adjust the positions as follows. However, if the offset is too large, the GX-24 may not be able to read the crop marks. If this happens, redo the work from the beginning.
-
From the File menu, click Printing Setup .
The Printing Setup dialog box opens.
-
Select the Fine adjustment check box, and then click Adjust.
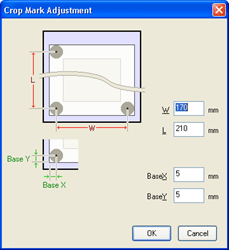
The Crop Mark Adjustment dialog box opens.
-
Align the position with respect to a line or point that is close to the origin. Adjust the Base X and Base Y values to eliminate the offset, and then click OK. Do not change the W and L values at this point.
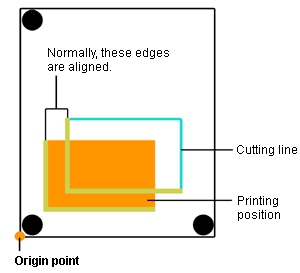
- The cutting position is offset to the left or right of the printing
position.
Change the Base X value. If the cutting position is offset to the right, increase the value; if it is offset to the left, decrease the value.
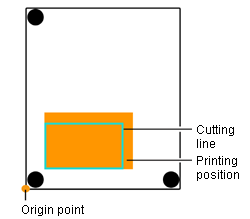
In the case shown in the figure above, increase Base X
- The cutting position is offset above or below the printing position.
Change the Base Y value. If the cutting position is offset above, increase the value; if it is offset below, decrease the value.
In the case shown in the figure above, increase Base Y
If the printing and cutting positions are offset at a location distant from the origin as shown in the figure below even after adjusting the positions with Base X and Base Y values, it is possible that the distance between the crop marks that are printed is offset from the settings (W and L). This may be due to the expansion or contraction of the material or distortion in the printing. Proceed to step 4.
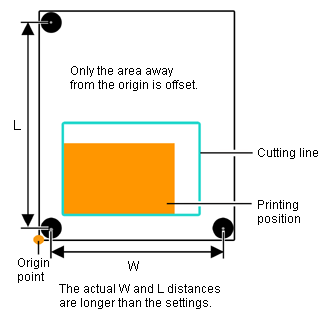
- Set W and L in the Crop Mark Adjustment dialog
box as described below to correct the error. However, the values are merely
guide lines. The optimal values must be found by changing the values and
actually cutting the material several times.
Notes
Before changing the settings, check that the Base X and Base Y settings have been adjusted with respect to a line or point close to the origin. If they were not, the adjustment result of step 3 will be offset if the W and L settings are changed.
- The cutting lines are offset outward from the printing position.
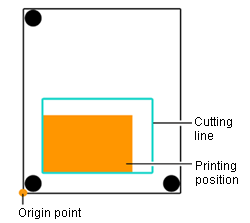
This may be because the distance between the printed crop marks is longer than the setting. In this case, set the W and L values greater than the settings to make the adjustment.
- The cutting lines are offset inward from the printing position.
This may be because the distance between the printed crop marks is shorter than the setting. In this case, set the W and L values smaller than the settings to make the adjustment.
Notes
The values entered in the Crop Mark Adjustment dialog box are effective only when Fine adjustment in the Printing Setup dialog box is enabled. All the entered values are cleared if Fine adjustment is disabled or if the W and L values of Crop marks are changed.