Performing printing
and cutting using a printer
|
You can use a commercially available printer to print the surface of the
material, and then cut the material using a cutting machine.
You can cut around the printed image to separate the image from the material.
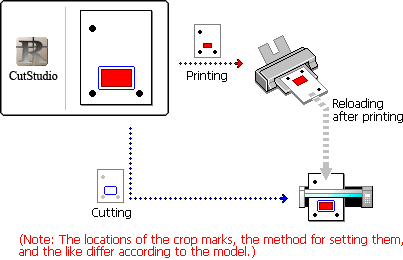
The general flow of printing and cutting operations is as shown below.
(* The positions of crop marks and the way that they are set vary depending
on the model.)

- Make the settings for the printer and the material size.
- Decide on the locations of the crop
marks.
- Create the data for printing and cutting inside the crop marks.
- Print the data with the printer.
- Load the printed material on the cutting machine.
- Send the cutting data to the machine.
After crop mark detection (performed automatically on the GR/GX/GS
or manually on the SV), cutting starts.
 Make the settings for the printer and the material
size
Enable printing and cutting, and then make the settings for printing.
- Go to the [File] menu and click [Print & Cut] to enable it.
The printing area and crop marks appear in the window.
The printing area is indicated by broken lines. This area is the material
size specified using [Set up the printer] minus the margins specified
using [Printing Setup].
- Go to the [File] menu and click [Set up the printer].
The [Print Setup] dialog box appears.
- Make the settings for the material size, the type of material,
and so on.
If you're using the SV, note that the orientation of loaded media is
restricted.
When expanded/reduced printing is enabled, disable it. Print at 100%
scale.
 Crop-mark settings
Crop marks are used when material printed on a printer is aligned for cutting.
Because these crop marks are detected using the cutting machine, they must
be printed inside the material's detection area (that is, within the cutting
area). (Detection is performed automatically on the GR/GX/GS and manually
on the SV.)
If even a portion of the crop marks falls outside the area, correct detection
may fail.
- Go to the [File] menu and click [Printing Setup].
The [Printing Setup] dialog box appears.
- Take into account the margin necessary for cutting the material
and set the crop mark position.
See "Margin and crop mark settings"
and enter suitable values.

 Crea
Crea
 Create the data for printing and cutting
Create
the data for printing and cutting inside the crop marks.
Cutting lines outside the crop marks may not be cut.

This examples assumes the printing and cutting data shown below has been
created.

 Perform printing on the printer, then cut the printed
material
Load
material on the printer, print the material, and then load the printed
material on the cutting machine.
Perform positioning on the cutting machine, and then cut the material.
- Load
the material to print on the printer.
For information about how to load the material, refer to the user's
manual for the printer.

- Go
to the [File] menu and click [Print].
The [Print] dialog box appears.
- Make
sure the printer to use for printing is selected, and then click [OK].
The printing data is sent to the printer and printing starts.
(Cutting lines are not printed.)

- After
printing has finished, load the material on the cutting machine.
Perform setup if the model you're using requires it.
The orientation of the material must not be changed when you
load it.


- Go
to the [File] menu and click [Cutting].
The [Cutting] dialog box appears.
- Make
sure the cutting machine to use for cutting is selected, and then
click [OK].
The cutting data is sent to the machine and cutting starts.

 Make the settings for the printer and the material
size
 Make the settings for the printer and the material
size
 Crop-mark settings
 Crea
Crea  Create the data for printing and cutting

 Perform printing on the printer, then cut the printed
material


